The Checkbook Project: A Personal Finance Project
or, How can I be out of money?!? I still have checks!!!
There are two versions of what my class always called The Checkbook Project.. One is an extended project built on every students’ dream: independence. The students have an income and need to research their living expenses from real life and real-time sources: newspapers, other print sources, TV advertising, the Internet, and so on. They then keep a checkbook, into which they deposit their income, and from which they pay all expenses. Skills involved range from decimal computation with the checkbook register, to percentages, and to graphing, with all kinds of more general problem solving and math skills coming into play.
The condensed version has students maintaining a checkbook given an income and a list of expenses. The same skills and concepts are involved here, without the added attraction (and time) that goes with getting to make their own lifestyle choices and then needing to research their costs.
Overview and Purpose
I used the checkbook project for about 20 years with students in Grades 5-8. It began in the 1980s as an exercise in decimal computation and went on to become a year-long project that we spent about 2 weeks on early in the year, and then revisited for one or two days a month thereafter. The full project is a pretty realistic simulation of personal finance. It is most appropriate for middle school students, though it has been used by high school and even some adult education teachers.
In this most recent rendition, the students receive an annual salary of $26,000. The scenario is that they have completed a curriculum or program that has prepared them to get and carry out a useful full-time job. The annual $26,000 figure breaks down to $12.50 per hour for a full year of 40-hour weeks. If this figure is unrealistic for your student population you can, of course, adjust it in either direction.
The project has a dual purpose: (1) to provide an interesting and realistic context in which students use math and develop some decision-making and interpersonal abilities, and (2) to practice a number of specific math skills and concepts. These include working with decimal amounts, calculating percentages, and any number of problem-solving skills.
Actually, there is a third purpose. The “hidden curriculum” in this project is always for students to accept the need to allocate scarce resources.


Scope of the Project
The full project involves a 16-page packet for each student. This includes an explanation of each of approximately 20 expenses and a discussion of income and deductions (taxes and insurance). There is a lot of detailed information in here and teachers should not underestimate the commitment involved in using the full project.
It takes several days to introduce because students need to research a number of expenses: house/apartment rental, car leases/loans, utilities, cell phone plans, etc., etc. Prior to starting, you will want to collect a couple weeks’ worth of classified ads from the local newspaper, so that students are looking at ads for actual houses, apartments, and cars, with actual prices, all from local sources.
The Internet is obviously a good source of information too, but the newspaper allows students to search local resources without a using lot of scarce computer resources and time. You can always find local or regional sources of ads for housing and cars besides the newspaper.
A time-saving alternative would be to have students search the classifieds and the Internet for housing, cars, etc., make their choices, and then add up their expenses to see if they can afford them. You can then make executive decisions about what is actually affordable and give students a small number of options to choose from (e.g., for vehicles, a Nissan Versa, a Chevy Spark, or a Ford Fiesta; for housing, you could give them a monthly limit, etc.)
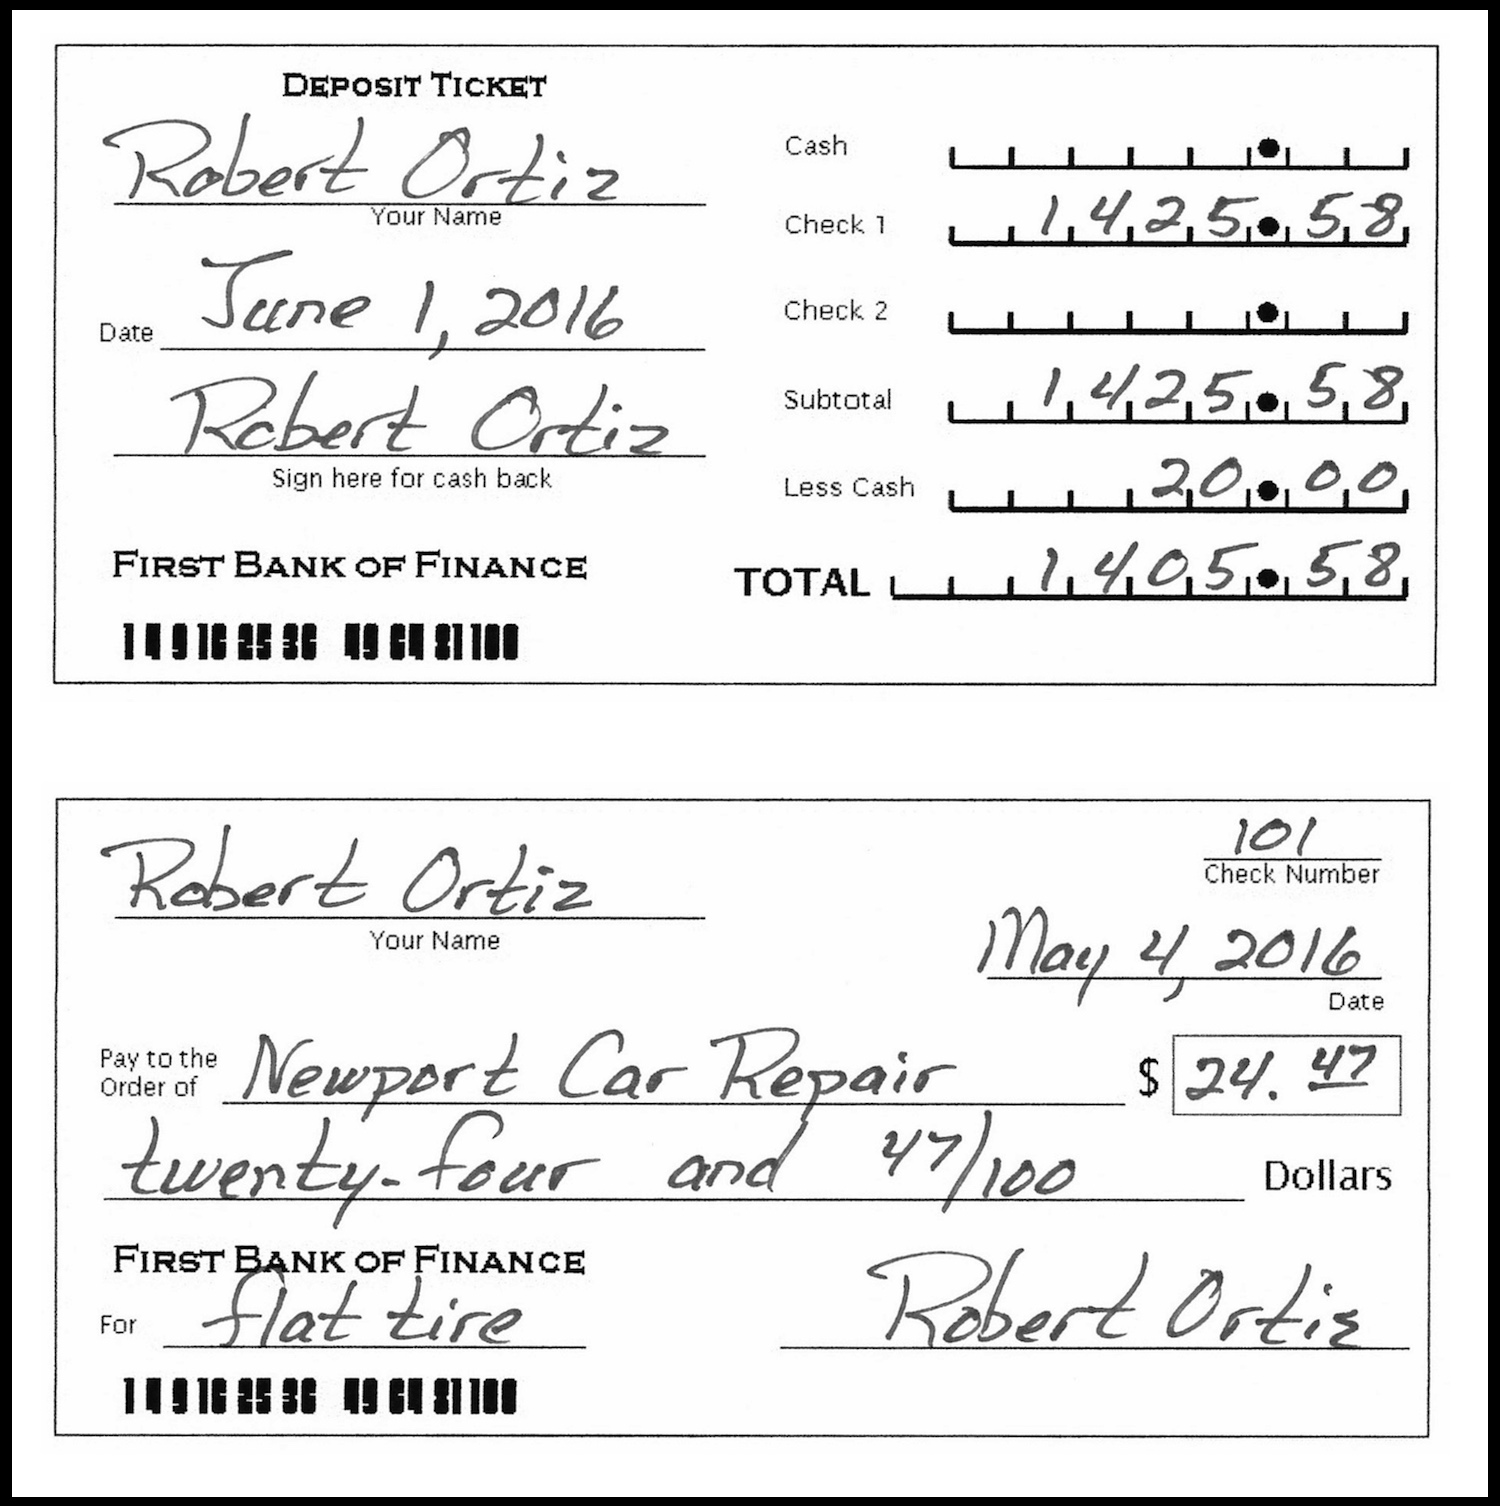
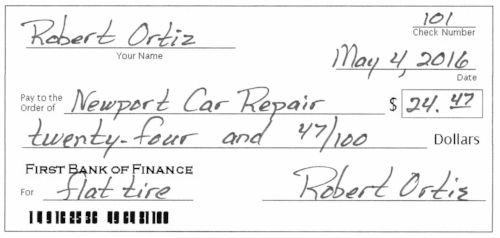
Once students have determined their expenses, you can begin the paydays. Students fill out a deposit slip for the amount of their take-home monthly salary, enter the amount in their checkbook registers, and begin to write checks to pay their bills.
You then plan to use 1 or 2 class periods near the start of each month for the rest of the school year to continue the project. Students take that time to deposit their paychecks, pay their bills, and decide what to do with the surplus, if they have one.
Living arrangements
You might suggest that students choose between one and three other people to share a house with and work with throughout the preparation phase. Student collaboration in this phase will be very valuable, although I always allowed students to work independently if they wanted to. About the touchy issue of who lives with whom: I simply forbade any romantic living arrangements and left it at that.
If you don’t have all that time…

The project can be condensed by simply giving students a specified income and a list of expenses, and requiring them to accurately maintain their bank balances. This is good decimal computation practice. Checks, deposit slips, and register pages are included in these files. This is, in fact, how the project began.
I suggest you still have students read and complete pages 1-6. Pages 1 and 2 set up the scenario. Pages 3-4 include some important financial vocabulary and show students how to calculate net income by itemizing and subtracting deductions.
You can take the list of Basic Monthly Bills on pages 5-6 and estimate plausible expenses based on any annual salary and monthly paycheck. Page 15 runs students through the process of writing checks and completing the register page.
Use Page 16a if you or your students are going to research individual expenses and use those in the project. There are a few expenses that are just assumed: car insurance, savings, and donations, for instance. You could go through the packet yourself and calculate reasonable figures, and then give those figures to your students to save class time.
Use Page 16b if you don’t have the time for either you or your class to do these calculations; this page gives a list of expenses corresponding to the $26,000 salary.
Use Page 16c if you want to supply all the figures yourselves; this is simply a blank list. Links to these files are below.


The living expenses are based on a student’s sharing a house or apartment with two others. Rent, utilities and city services would be higher if a student were living alone. These 6 pages are included in a single file entitled Checkbook Condensed Project.
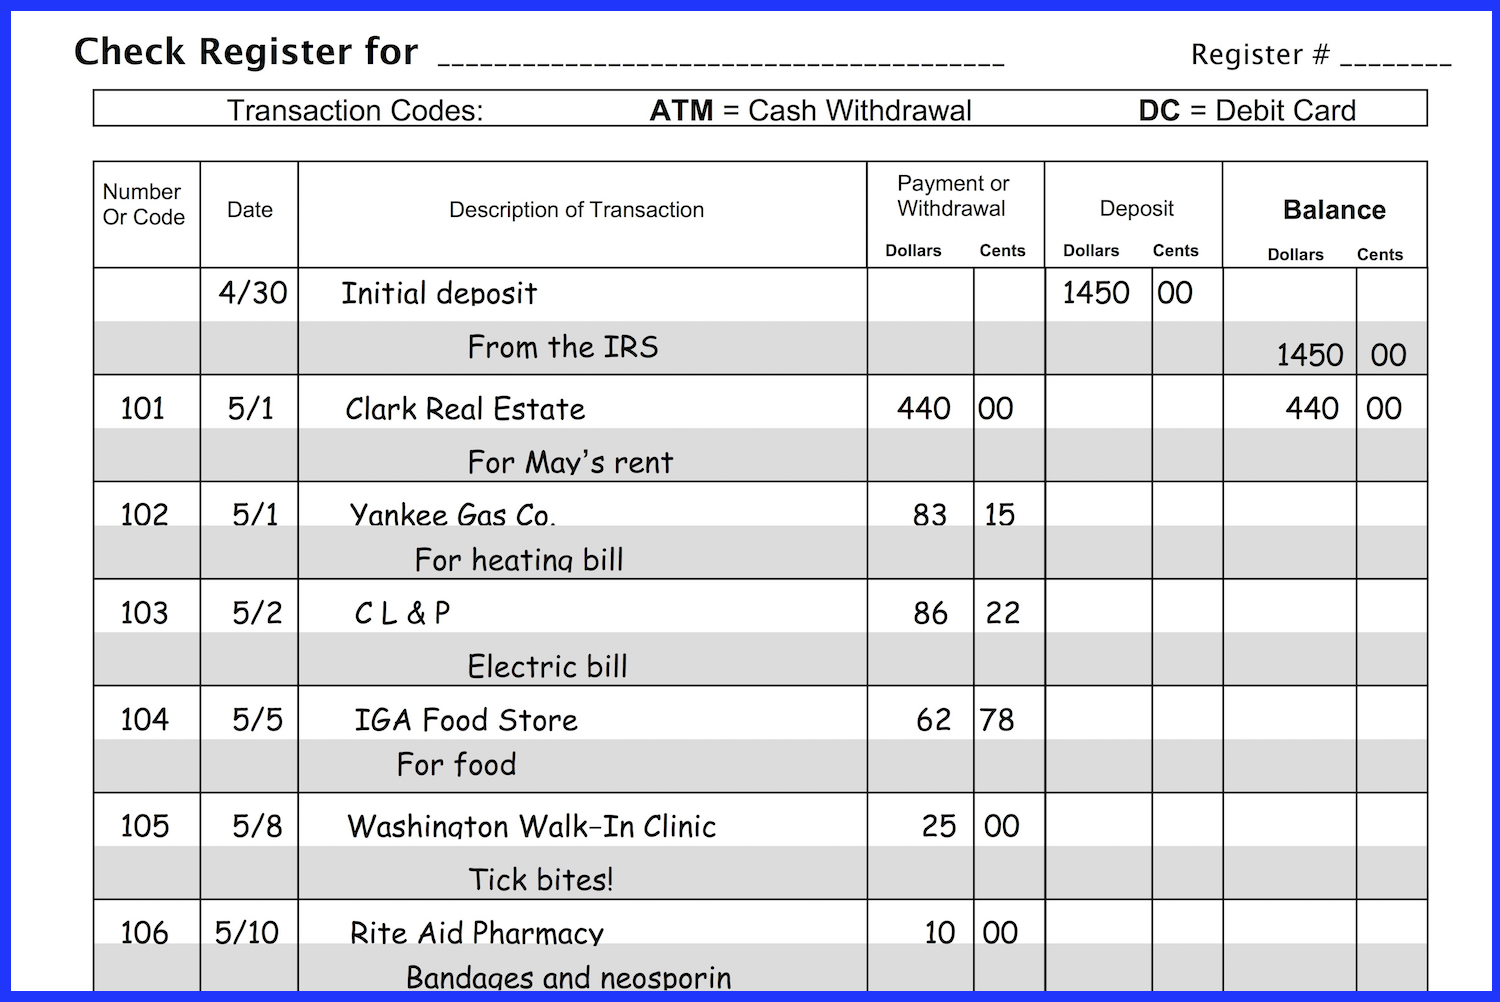
The checkbook register

When I first began this project, debit cards hadn’t been invented and direct deposit was in its infancy. Now, the checkbook is becoming a thing of the past. However, I suggest you still have students write checks for all expenses and fill out deposit slips for all income, at least starting out. That way they know where their money goes and have a written record of every transaction.
However, to save time and paper, and to bring this project into closer alignment with the way personal finances are actually done these days, you can use checks and deposit slips for the first couple of monthly cycles,and then transition to electronic transactions. In this case, students would eventually record all transactions in the register only.
Students can work in groups to check each others’ registers, and make sure the math is accurate. One student can sign off on another student’s register as the second student’s “accountant,” certifying that the balance is accurate. This means you, as the teacher, don’t need to check all those computations (though you will have a pretty good idea of how much money they should have left after paying their bills).
A variation on this peer monitoring method is for each student to assume the role of the bank and be assigned to check another student’s math. If the “bank” finds any computation error, the student making the mistake would write a check payable to the student serving as “bank.” The real money in this arrangement is if the “bank” finds an overdraft, and can then charge $25 for each bounced check.
Unexpected expenses and windfalls

To keep things interesting, you can pass out “Wild Expenses” and “Surprise Income” slips after the first month or two. Shuffle a bunch of these cards together and pass them out randomly after bills are paid. I always passed out about twice as many expense cards as income cards. You can always solicit student ideas for additional windfalls and expenses.
Graphing ideas
After several monthly cycles, you can use your students’ numbers for graphing practice. Here are some possible uses:
1. Graph the expenses
Students group all their monthly expenses into categories (living expenses, transportation, insurance, house, etc.). They then create graphs showing the absolute amounts (bar graph) or relative amounts (pie chart).
2. Graph the class’s average expenses
Add up and average the amounts each student spends within each category, and graph those numbers in the same way.
3. Graph monthly heating expenses
This is a device for giving students practice making line graphs, since it’s probably the only figure that changes over time. This can also be done on an individual basis, or with the class average.
4. Car price or monthly payment
This would be interesting. Create a line plot or bar graph showing the sale price of each student’s car. You could do the same with the students’ monthly car payments. Students could also create pie charts giving the numbers or percentages of students whose payments fall within specific ranges.
Easy money (?) – The Lottery
Students who bought more house or car than they could easily afford were always asking for lottery winnings to be included in the Surprise Income cards. You might consider operating a lottery once a month.
Students can write a check for tickets at $2 each (or whatever you want the price to be). They get a receipt with their ticket numbers on it (If students each wrote a check for $10, the first would get a receipt for ticket numbers 1-5, the second a receipt for ticket numbers 6-10, and so on.)
Below is a simple Excel spreadsheet that calculates the amount of money in the lottery and generates a random winning number. The holder of the winning ticket number fills out a deposit slip and enters the winnings in his or her checkbook register.
When you open the spreadsheet, there will be no entry for either the cost of each ticket in cell B5, or the number of tickets sold in cell B7. After all lottery tickets have been sold, you (or a student) completes those two cells. The spreadsheet will then generate the winning ticket number and calculate the winner's earnings.
The lottery prize is always 60% of the total wagered. This is the amount returned to winners by most lottery operations where the pool is split among the winners. The program also reports the total amount wagered and the total amount lost by everyone but the winner, to keep visible the fact that gambling is, for the gamblers, a losing game. Interest in the lottery eventually subsided each and every year we did that.
Open or download The Checkbook Lottery
Loan payment calculators
There are several variables in loan calculations: principal, interest rate, term (number of monthly payments), amount paid each month, and total amount paid back. Some loan calculators also specify the total amount of interest paid.
A good loan calculator asks you to input any 3 of these and will then calculate the rest. Most commonly you’ll want to know the monthly payment given the principal, interest rate, and number of payments. Or given a monthly payment that a student can afford, input the principal, interest rate, and payment amount, and the calculator will yield the number of payments it’ll take to pay back the loan. These are useful for adults as well.
The two sites linked below are fairly clear and will perform the above tasks. This is not an endorsement of them; I've only used them a few times.
This site has an Excel spreadsheet-based Auto Loan Calculator available for download.
http://www.vertex42.com/Calculators/auto-loan-calculator.html
This site will do any of the calculations mentioned above. Input the 3 known terms directly on the site.
http://www.free-online-calculator-use.com/missing-term-loan-calculator.html
There are many similar sites on the Internet.
Files for download
Below are all the files mentioned above. All are PDFs except the lottery spreadsheet. Good luck!
Here are the student pages for the full project: CheckbookProjectStudentFullPacket
Here’s the condensed project: CheckbookProjectCondensed
Check and deposit slip pages to print: CheckandDepositSliptoPrint
A register page: CheckRegisterPage
Register practice: CheckbookRegisterPractice
The lottery spreadsheet: CheckbookLottery
Surprise income: CheckbookSurpriseIncome
Wild expenses: CheckbookWildExpense